WireGuard隧道
VPS转发
内核转发
- 切换到root shell:
sudo -i - 开启IPv4转发:取消
/etc/sysctl.conf中net.ipv4.ip_forward=1的注释 - 写入内核立即生效:
sysctl -p,并验证- 验证状态:
sysctl net.ipv4.ip_forward - 输出
net.ipv4.ip_forward = 1则成功
- 验证状态:
开启linux的内核转发后,VPS可将WireGuard加密隧道的流量转发到公网网卡,只不过这一过程中还需VPS进行网络地址转换(postrouting),将私网流量伪装(masquerade)成公网流量,才能通过HTTP与其他公网交互
地址转换
查看当前VPS的默认出口网卡:
ip route show default- 输出
default via xx.xx.xx.xx dev enp1s0 proto dhcp src xx.xx.xx.xx metric 100 - 表示在路由表中找不到任何更具体匹配规则的目的地址,都会通过网卡
enp1s0发给via后的网关,使用 DHCP 下发的配置,源地址为src后的地址,优先级为 100
- 输出
添加NAT规则:
iptables -t nat -A POSTROUTING -s 10.0.0.0/24 -o enp1s0 -j MASQUERADE-t nat -A POSTROUTING在数据包即将离开VPS时操作NAT表-s 10.0.0.0/24自动处理所有源IP属于10.0.0.0/24这个网段的WireGuard包-o enp1s0只对走公网网卡的流量生效MASQUERADE自动使用当前公网IP1
2
3
4
5
6
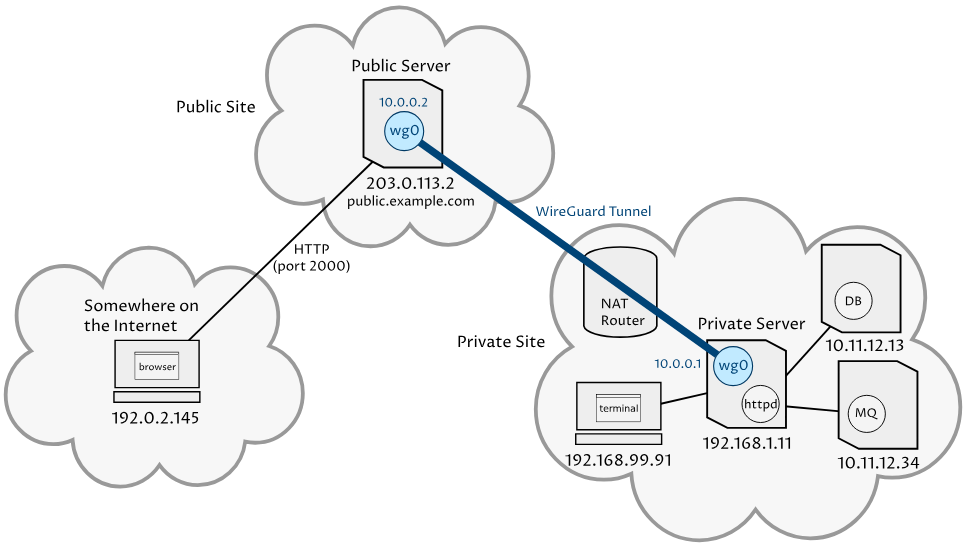
7[ MacBook ] 10.0.0.2
| WireGuard 加密隧道
[ VPS wg0 ] 10.0.0.1
| NAT
[ VPS 独立IPv4 ] xx.xx.xx.xx
| 公网
[ Internet ]
验证NAT规则:
iptables -t nat -L POSTROUTING -n -v1
2
3
4root@hwo-tokyo-vps:~# iptables -t nat -L POSTROUTING -n -v
Chain POSTROUTING (policy ACCEPT 0 packets, 0 bytes)
pkts bytes target prot opt in out source destination
0 0 MASQUERADE all -- * enp1s0 10.0.0.0/24 0.0.0.0/0安装持久化工具,避免重启消失:
apt install -y iptables-persistent验证规则是否被保存:
iptables-save | grep MASQUERADE1
2root@hwo-tokyo-vps:~# iptables-save | grep MASQUERADE
-A POSTROUTING -s 10.0.0.0/24 -o enp1s0 -j MASQUERADE
NAT(Network Address Translation),内核转发后还需将私网IP伪装成公网IP,才能与公网交互
IPv4的本质是一个32位二进制证书,为了便于阅读将它拆为4段,每一段的合法范围是0~255
/24是CIDR子网掩码,表示前24位是网络位,后8位是主机位
2
3
4
/24 掩码 = 11111111.11111111.11111111.00000000
-----------------------------------------------
网络地址 = 10.0.0.0,所覆盖的IP范围是10.0.0.0~10.0.0.255
防火墙
放行WireGuard出入站端口(默认UDP 51820)及
wg0经enp1s0网卡转发1
2
3ufw allow 51820/udp
ufw route allow in on wg0 out on enp1s0
ufw route allow in on enp1s0 out on wg0检查UFM路由规则:
ufw status verbose1
2
3
4
5
6
7
8
9
10
11
12
13
14
15
16
17root@hwo-tokyo-vps:~# ufw status verbose
Status: active
Logging: on (low)
Default: deny (incoming), allow (outgoing), deny (routed)
New profiles: skip
To Action From
-- ------ ----
22/tcp ALLOW IN Anywhere
51820/udp ALLOW IN Anywhere
22/tcp (v6) ALLOW IN Anywhere (v6)
51820/udp (v6) ALLOW IN Anywhere (v6)
Anywhere on enp1s0 ALLOW FWD Anywhere on wg0
Anywhere on wg0 ALLOW FWD Anywhere on enp1s0
Anywhere (v6) on enp1s0 ALLOW FWD Anywhere (v6) on wg0
Anywhere (v6) on wg0 ALLOW FWD Anywhere (v6) on enp1s0修改WireGuard的默认初入站端口,并删除旧端口
1
2
3ufw allow xxxxx/udp
ufw status numbered
ufw delete <51820对应的编号>
WireGuard隧道
VPS端
安装
- 安装:
sudo apt install -y wireguard - 验证:
wg --version、wg-quick --help - 检查ip:
ip link show | grep wg,因为还未启动此时无任何WireGuard接口
配置
root进入WireGuard目录:
cd /etc/wireguard,执行以下命令生成密钥对1
2wg genkey > server_private.key
wg pubkey < server_private.key > server_public.key限制私钥文件读写权限:
chmod 600 server_private.key,只允许拥有者(root)进行读写- 检查权限:
ls -l server_private.key
- 检查权限:
在
/etc/wireguard目录中创建并编辑wg0.conf1
2
3
4
5
6
7
8
9
10[Interface]
Address = 10.0.0.1/24
ListenPort = 51820
PrivateKey = <server_private.key>
DNS = 8.8.8.8
MTU = 1420
[Peer]
PublicKey = <client_public.key>
AllowedIPs = 10.0.0.2/32- 首次配置VPS端WireGuard时
[Peer]暂时不添加 - 后续添加
[Peer],需重载WireGuard:wg syncconf wg0 <(wg-quick strip wg0) - 将此文件限制为只有root可读写:
chmod 600 wg0.conf
- 首次配置VPS端WireGuard时
权限由三组数字构成:
[ 拥有者 ][ 同组用户 ][ 其他人 ]
数字由三种权限相加:4-读 + 2-写 + 1-执行
2
3
↑ ↑ ↑
owner group other
启动
启动
wg0接口:wg-quick up wg01
2
3
4
5root@hwo-tokyo-vps:~# wg-quick up wg0
[#] ip link add wg0 type wireguard -> 创建内核级WireGuard接口
[#] wg setconf wg0 /dev/fd/63 -> 加载wg0.conf
[#] ip -4 address add 10.0.0.1/24 dev wg0 -> 给wg0分配VPN内网IP
[#] ip link set mtu 1420 up dev wg0 -> 为UDP+IP+WireGuard加密头部预留空间当默认监听端口51820改变时,需要重启WireGuard
1
2wg-quick down wg0
wg-quick up wg0
MTU(Maximum Transmission Unit)单个数据包在链路层能承载的最大字节数,在绝大多数以太网中物理网卡MTU=1500字节,若总长度>1500会导致IP分片或直接被丢弃
WireGuard的封装结构可以简化为[8字节外层IPv4头]+[8字节UDP头]+[约60字节WireGuard加密头]+[原始IP包],剩余可用空间约1412字节,WireGuard默认预留1420字节
检查
验证
wg0接口是否存在:ip addr show wg01
2
3
4
5root@hwo-tokyo-vps:~# ip addr show wg0
3: wg0: <POINTOPOINT,NOARP,UP,LOWER_UP> mtu 1420 qdisc noqueue state UNKNOWN group default qlen 1000
link/none
inet 10.0.0.1/24 scope global wg0
valid_lft forever preferred_lft forever验证WireGuard是否在监听UDP端口:
ss -lunp | grep 518201
2
3root@hwo-tokyo-vps:~# ss -lunp | grep 51820
UNCONN 0 0 0.0.0.0:51820 0.0.0.0:*
UNCONN 0 0 [::]:51820 [::]:*查看当前WireGuard状态:
wg,无客户端时只能看到[Interface]信息
客户端
使用非国区Apple ID下载WireGuard GUI客户端
密钥
生成客户端密钥对在当前路径:
wg genkey | tee client_priavte.key | wg pubkey > client_public.key- 设置私钥文件用户权限:
chmod 600 ./client_priavte.key - 也可以直接使用GUI客户端生成密钥对,效果一样
- 设置私钥文件用户权限:
复制客户端公钥文件到VPS:
scp client_public.key arvin@xx.xx.xx.xx:/tmp- 在VPS的
/etc/wireguard/wg0.conf末尾补充[Peer]信息并重载
- 在VPS的
配置
客户端创建并编辑
macbook-wg0.conf文件- 与VPS的
wg0.conf同理,只不过客户端成了[Interface],VPS成了[Peer] - 导入WireGuard GUI并启用即可,此时为全局代理
1
2
3
4
5
6
7
8
9
10
11[Interface]
PrivateKey = <client_priavte.key>
Address = 10.0.0.2/32
DNS = 8.8.8.8
MTU = 1420
[Peer]
PublicKey = <server_public.key>
AllowedIPs = 0.0.0.0/0
Endpoint = xx.xx.xx.xx:51820
PersistentKeepalive = 25- 与VPS的